Applying blood and reading results:
Applying the sample:
1. Apply the sample to the test strip
- You can apply blood to either side of the test strip.
- Apply your sample to the opening of the channel.
- Be sure to apply your sample immediately after you get a drop of blood.
- Holding the meter at a slight angle, guide the channel to the blood drop.
- When it touches your sample, the test strip wicks blood into the channel.
2. Wait for the channel to fill completely
- The blood drop will be drawn into the narrow channel. The channel should fill completely.
- The channel turns red and a result will be displayed after approximately 5 seconds.
- Blood should not be applied on the top of the test strip or to the top edge of the test strip.
- NOTE:
- Do Not smear or scrape the sample with the test strip.
- Do Not press the test strip too firmly against the puncture site or the channel may be blocked from filling properly.
- Do Not apply more blood to the test strip after you have moved the drop of blood away.
- Do Not move the test strip in the meter during a test or you may get an error message or the meter may turn off.
- Do Not remove the test strip until the result is displayed or the meter will turn off.
Viewing your result:
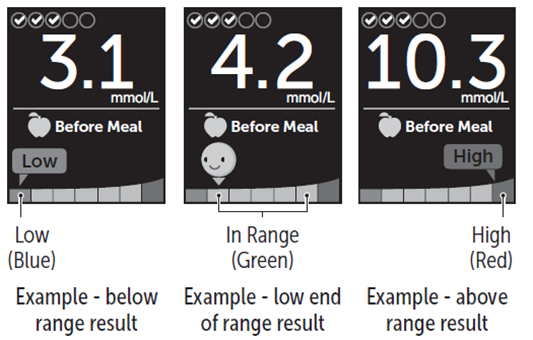
- ColourSure® Dynamic Range Indicator:
- The OneTouch Verio Reflect® Meter comes with a ColourSure® Dynamic Range Indicator feature that instantly lets you know if your current result is below (blue), within (green) or above (red) your range limits. It also shows when your result is near the low or high end of your target range. It does this by displaying your result with a Range Indicator icon pointing to a segment on the Colour Bar based on the ranges you have set in the meter. The Range Indicator icon may be either an emoji (for example,
 ) or text (for example
  ). Use the Range Indicator icon and the segmented Colour Bar together to see where your result falls within your range limits.
- If the Test Tracker is turned on, progress toward the Daily Test Goal will be indicated above the result. If the Test Tracker is turned off, the date and time will be shown above the result. The date and time are always recorded with each result and can be viewed in the Results Log.
- WARNING:
- Confirm that the unit of measure mmol/L is displayed. If your display shows mg/dL rather than mmol/L, stop using the meter and contact Customer Care.
- CAUTION:
- Do Not make immediate treatment decisions based on the ColourSure® Dynamic Range Indicator feature. Treatment decisions should be based on the numerical result and healthcare professional's recommendation and not solely on where your result falls within your range limits.
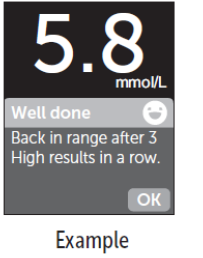
- After the result screen appears, a Pattern Message, Mentor Tip or Award may be displayed. The Message can be dismissed by pressing OK. If you would like to bring the Message back, press OK again. For more information about Messages, see:
- A Before Meal tag will automatically be applied to your result. When you change a Before Meal tag to an After Meal tag, the Range Indicator icon may point to a different segment on the Colour Bar. A new Message may appear. For information on tagging results:

