Control Solution Testing:
When to test with control solution:
- OneTouch® Select™ Control Solution contains a known amount of glucose and is used to check that the meter and the test strips are working properly.
- Do a control solution test:
- to practice the test process instead of using blood,
- whenever you open a new vial of test strips,
- if you suspect the meter or test strips are not working properly,
- if you have had repeated unexpected blood glucose results as described in the following article:
- or, if you drop or damage the meter.
- NOTE:
- Use only OneTouch® Select™ Control Solution with your OneTouch® SelectSimple™ Meter.
- Control solution is available separately.
- Control solution tests must be done at room temperature 20–25°C. Make sure your meter, test strips, and control solution are at room temperature before testing.
- CAUTION:
- Do Not swallow control solution; it is not for human consumption.
- Do Not apply control solution to the skin or eyes as it may cause irritation.
How to test with control solution:
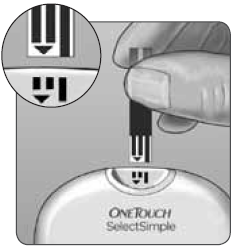
1. Insert a test strip to turn the meter on
-
- Make sure the three contact bars are facing you and the arrow is pointing down. Push the test strip in as far as it will go. Do Not bend the test strip.
2. Wait for the meter to prompt you to apply a control solution sample
-
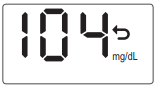
- After the start-up test screen, your last result (blood glucose or control solution test) will appear on the display, and the back arrow icon will blink.
-
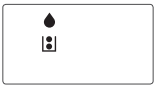
- After your last result is displayed, your meter will beep and an icon appears showing a drop with a test strip that fills. This indicates that your meter is ready for you to apply a control solution sample. You have 2 minutes to apply a control solution sample before the meter turns off.
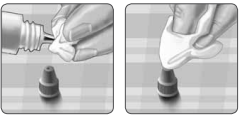
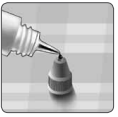
3. Prepare the control solution
-
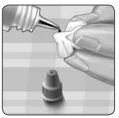
- Before removing the cap, shake the vial gently. Remove the vial cap and place it on a flat surface with the top of the cap pointing up. Squeeze the vial to discard the first drop.
-
- Wipe both the tip of the control solution vial and the top of the cap with a clean, damp tissue or cloth.
-
- Then, squeeze a drop into the small well on the top of the cap or onto another clean, non-absorbent surface.
4. Apply the control solution
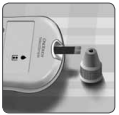
-
- Hold the meter so that the narrow channel at the top edge of the test strip is at a slight angle to the drop of control solution.
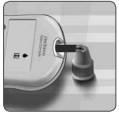
-
- Touch the channel on the top edge of the test strip to the control solution. Wait for the channel to fill completely.
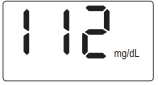
5. Read your result
-
- When the confirmation window is full, the meter will count down from 5 to 1. Your control solution result will then appear on the display along with the unit of measure.
- NOTE: If the HIGH/LOW alarm is activated during control solution testing, do not be concerned or take any action. The HIGH/LOW alarm should not be used to evaluate control solution results.
6. Check if the result is in range
-
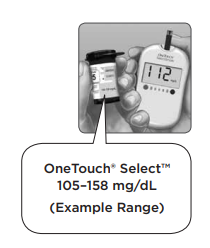
- Compare your result to the range on the test strip vial.
- Each vial of test strips has a OneTouch® Select™ Control Solution range printed on its label. Compare the result displayed on the meter to the OneTouch® Select™ Control Solution range printed on the test strip vial depending on the type of control solution you used.
- If the result you get is not within the appropriate range, the meter and test strips may not be working properly. Repeat the control solution test.
7. Cleaning
-
- Clean the top of the control solution cap with a clean, damp tissue or cloth.
- Out-of-range results may be due to:
- not following the instructions detailed in steps 1–7,
- expired or contaminated control solution,
- expired or damaged test strip,
- use of a test strip or control solution past its discard date,
- a problem with the meter, or
- control solution test was performed outside the correct temperature range 20–25°C.
- NOTE:
- It is important to compare your control solution result with the correct range printed on the test strip vial or your result may appear to be out of range.
- IMPORTANT:
- The next time you test, your last test result (which appears on the display when you insert a test strip) is from a control solution test, and not a blood glucose test.
- CAUTION:
- The control solution range printed on the test strip vial is for OneTouch® Select™ Control Solution only. It is not a recommended range for your blood glucose level.
- CAUTION:
- If you continue to get control solution results that fall outside the range printed on the test strip vial, Do Not use the meter, the test strip, or the control solution.

