Applying blood and reading results:
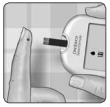
1. Prepare to apply the sample
-
-
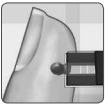
- Keeping your finger extended and steady, move the meter and test strip toward the blood drop.
-
-
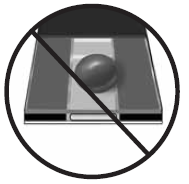
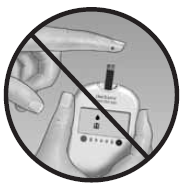
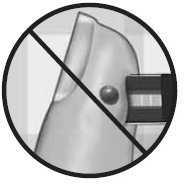
- Do Not apply blood on the top of the test strip.
-
-
- Do Not hold the meter and test strip underneath the blood drop. This may cause blood to run into the test strip port and damage the meter.
2. Apply the sample
-
-
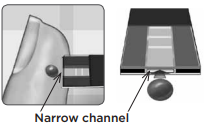
- Line up the test strip with the blood drop so that the narrow channel on the edge of the test strip is almost touching the edge of the blood drop.
-
-
- Gently touch the channel to the edge of the blood drop.
-
-
- Be careful not to push the test strip against your fingertip or the test strip may not fill completely.
- Do Not smear or scrape the drop of blood with the test strip.
- Do Not apply more blood to the test strip after you have moved the drop of blood away.
- Do Not move the test strip in the meter during a test.
- CAUTION:
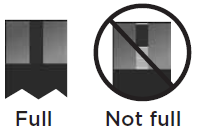
- You may get an ERROR 5 message or an inaccurate result if the blood sample does not fill the confirmation window completely.
- Discard the test strip and re-start the test process.
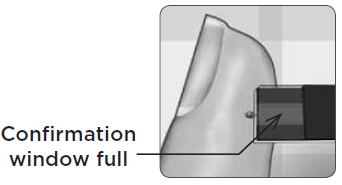
3. Wait for the confirmation window to fill completely
-
-
- The blood drop will be drawn into the narrow channel and the confirmation window should fill completely.
-
-
- When the confirmation window is full, this means you have applied enough blood. Now you can move the test strip away from the blood drop and wait for the meter to count down from 5 to 1.
4. Read your result on the meter
-
-
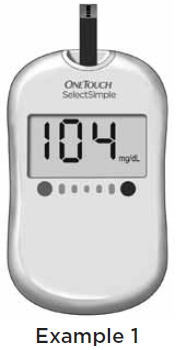
- After the meter counts down, your blood glucose level appears on the display along with the unit of measure.
- In this example, the test result is 104 mg/dL. The meter will beep once but no arrow will appear below your result.
-
-
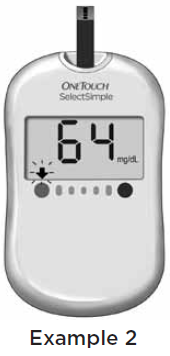
- If your test result is “LOW”, “HIGH”, or “VERY HIGH”, an arrow will appear below your result and point to one of two colour dots. The meter will also beep.
- In this example, the test result is 64 mg/dL. A blinking arrow will point to the BLUE DOT on your meter, and the meter will beep twice each time the arrow blinks. This represents a “LOW” result, below 70 mg/dL.
- See the next section for more information on “LOW”, “HIGH”, and “VERY HIGH” results.
Knowing when your test result is “LOW”, “HIGH”, or “VERY HIGH”:
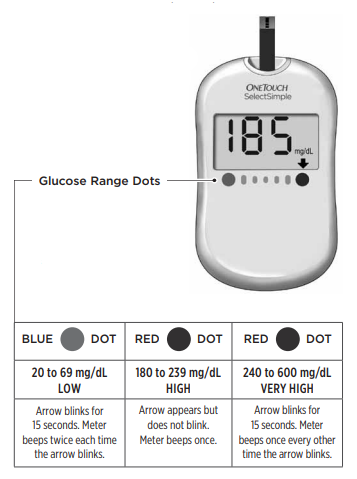
- Your meter has two colour dots below the display. Each dot corresponds to a pre-set “LOW”, “HIGH”, and “VERY HIGH” glucose range.
- The combination of an arrow (blinking/not blinking) pointing to one of the two colour dots and the meter beeping, will tell you if your result is “LOW”, “HIGH”, or “VERY HIGH”.
-
-
- In this example, the test result is 185 mg/dL. An arrow will point to the RED DOT and the meter will beep once. This represents a “HIGH” result, above 180 mg/dL.
- WARNING:
- The unit of measure mg/dL must be displayed here. If your display shows mmol/L rather than mg/dL, contact Customer Care or visit OneTouchDiabetes.co.in. You cannot change the unit of measure. Use of the wrong unit of measure may cause you to misinterpret your blood glucose level, and may lead to incorrect treatment.
- CAUTION:
- If your blood glucose is high and you test when the temperature is at the low end of the operating range 10°C, the result on your meter may be lower than your actual glucose level. Re-test in a warmer environment with a new test strip as soon as possible.
- Do Not make immediate treatment decisions based on whether your results fall within one of these pre-set ranges.
- Treatment decisions should be made based on the numerical result and your healthcare professional’s recommendations.
- Consult with your healthcare professional as to how the pre-set ranges defined by the two dots on your meter apply to your personal target range.
Error Messages:
- If you get an ERROR message on your screen rather than a result, see article:

